Dear reader, I’ve kept my posts fairly approachable to general audiences, but we’re going deep on this one. It will be a whirlwind of coding, AI, and technical jargon and a smattering of links to repos and YouTube videos as I recount my Sunday adventure. If you’re not somewhat familiar with code and current AI trends, I applaud your dedication for pressing forward, hopefully something piques your interest. And for those of you more familiar with the topics, this will be an unholy mess. Enjoy!
I started the day by getting AutoGen running with gpt-4:
I followed along with this particular video just to save some time in reading the documentation fully and it was quite helpful:
Only a few minutes into AutoGenning on my own, I hit the rate limit for gpt-4. I could have switched to gpt-3.5 but ultimately decided local AI might be more useful.
Poking around the AutoGen blog I saw this:
So then I jumped around a few more articles to evaluate my local model options because I wasn’t familiar with FastChat, and decided on Llama 2 instead.
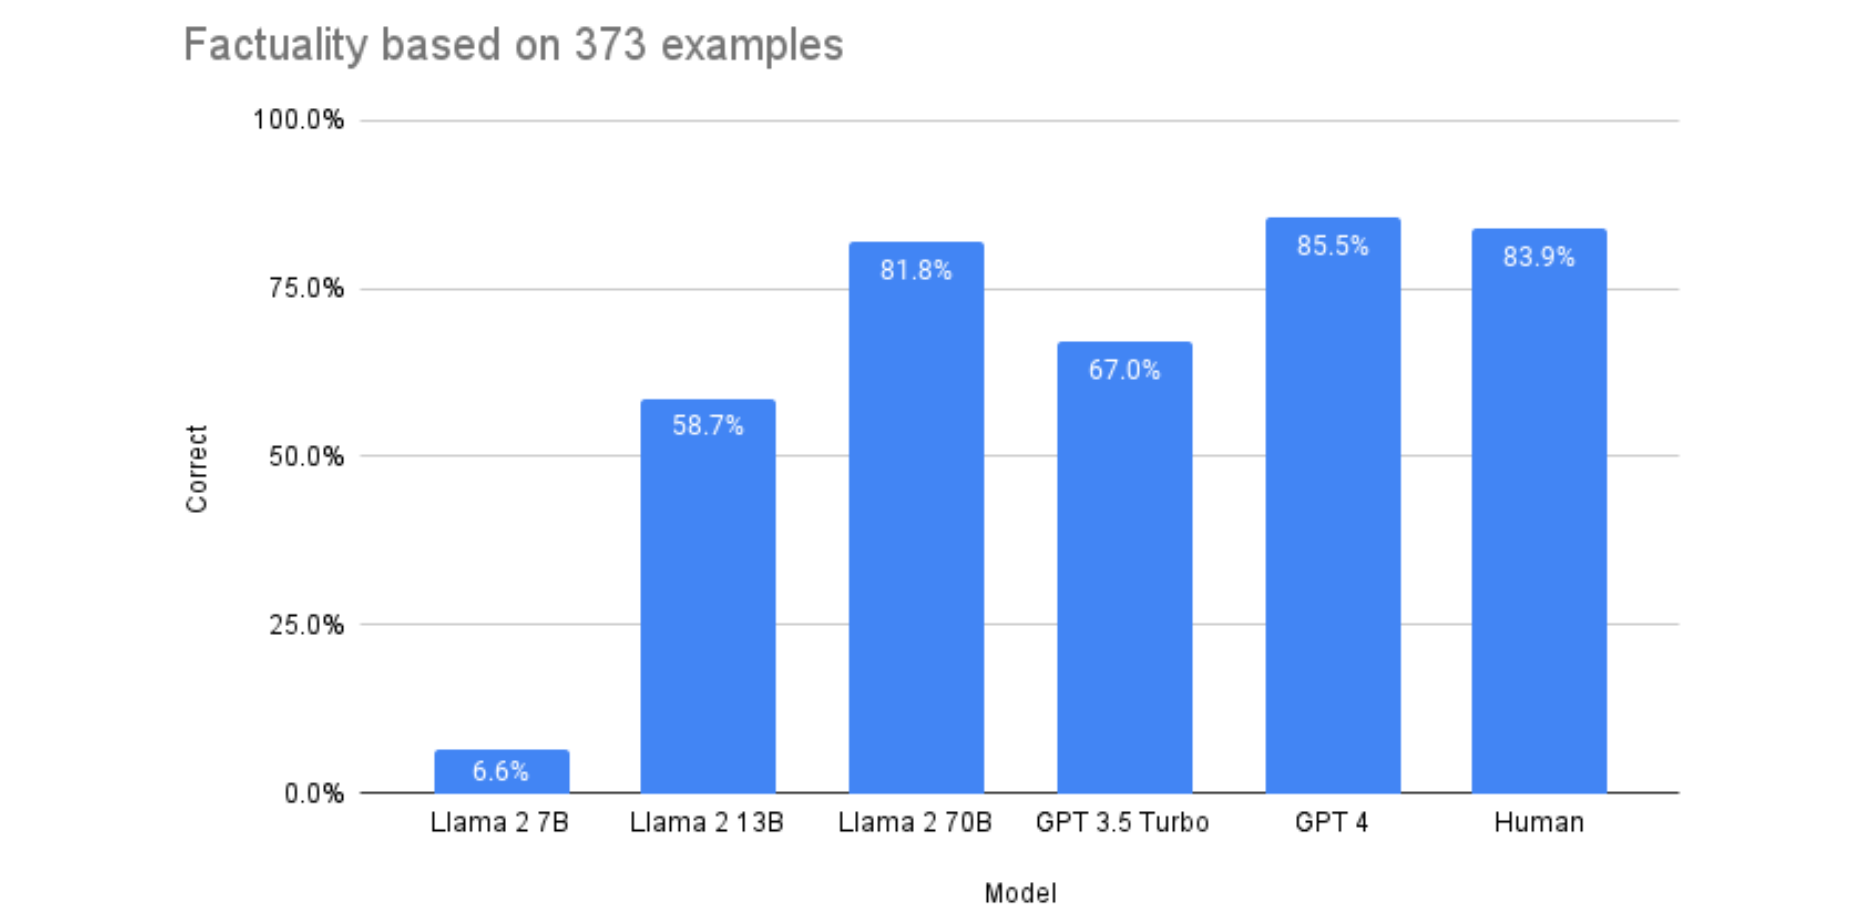
The article above suggests, after some testing, Llama-2-70b is nearly equivalent to gpt-4 and I’ve gotten quite comfortable with gpt-4, so Llama 2 it was.
First I signed up for Meta’s Llama 2: Llama access request form - Meta AI
But I couldn’t get the download to work for Llama 2 due to Windows 11 and Powershell not executing bash (.sh) files. I was trying to execute
wsl ./download.sh with WSL (Windows Subsystem Linux) but having no luck. More Googling led to running the wsl -l command printing only 2 options:
docker-desktop
docker-desktop-data
I was missing an actual Linux distro. A quick wsl install ubuntu later, I installed Ubuntu, then wsl --set-default ubuntu and it was ready to run.
One final issue I kept was when trying to execute wsl ./download.sh, it would result in:
wsl ./file /usr/bin/env: ‘bash\r’: no such file or directory. The download.sh file had Windows line endings of \r or CRLF as this post pointed out: https://stackoverflow.com/questions/29045140/env-bash-r-no-such-file-or-directory
Following the command from the posted resolution:
sed $'s/\r$//' ./download.sh > ./download.Unix.shand voilà, I had a new Ubuntu executable download.Linux.sh script.
Next, when prompted, I greedily selected all versions of Llama 2 to download:
Llama-2-7b
Llama-2-7b-chat
Llama-2-13b
Llama-2-13b-chat
Llama-2-70b
Llama-2-70b-chat
I alt-tabbed away to see what I had signed up for, confirmed it would be a 300GB+ download of Llama 2 models, and continued Googling if I even wanted to wait for however long that was going to take.
Skimming through a few more YouTube videos, this one in particular:
highlighted that others have already optimized Llama 2 models to work better for CPUs and GPUs (GGML was mentioned in the video, but GGML has already been replaced by GGUF for CPUs, and then GPTX for GPUs).
In the back of mind, I knew this is what would happen: I would go through all the troubleshooting of getting the direct Meta Llama 2 download to work, only to find there were much easier and better options. I’m sure there was some lesson from that excursion. Probably to measure twice and cut once.
With realization settling in, I noticed the video mentioned “TheBloke” as a source for some of these further optimized models, and after checking out TheBloke’s listings on HuggingFace, I decided that would be my source instead of Meta.
I canceled the 300+ GB download from Meta directly, and opted for https://huggingface.co/TheBloke/Llama-2-70B-chat-GGUF
While that was downloading, I did some more Googling for potential step-by-step instructions to run AutoGen with local AI models on Windows, and was lucky enough to find this gem:
Well written coding instructions and The Matrix, what’s not to love?
After breezing through the install process, text-generation-webui was up and running. It was a much smoother endeavor than downloading Meta’s Llama 2, but surprisingly time-consuming - approximately 15+ minutes of scripts running to set up various python environments and containers. But only the UI portion was working, I was still missing the AI model.
The llama-2-70b-chat-gguf model had finished downloading during all of this so I tried to feed llama-2-70b-chat-gguf as an option to the Models tab of text-generation-webui, but it failed to load. “Error: Connection errored out.”

Googling again, the culprit seemed to be a “not enough RAM” issue. A little more digging and I realized I don’t have 40+ GB of RAM to run the 70b model, I only technically have 31.8GB available of the total 36GB of RAM installed for my entire computer. Clearly I wasn’t going to be able to run 70b at all, so llama-2-7b-chat it was.
Somewhat begrudgingly I downloaded TheBloke’s Llama-2-7b-Chat-GGUF, I was excited about 70b, but I’ll readdress if it’s even necessary later. 7b should suffice in the meantime. And many thanks to TheBloke for creating multiple versions of both! I ended using this one instead:
Specifically the recommended Q5_K_S file because it could comfortably run at a max of 7.15 GB which is much more manageable than 40+ GB.

After downloading the file, and inputting the filename into text-generation-webui’s Model interface, it loaded successfully, and I finally had a working chatbot on my local machine!

The final steps from the post I mentioned earlier said to enable an extension to have the output of the model mimic OpenAI’s format, and restart text-generation-webui with an updated command. In my case, one that specified llama-2-7b-chat (or whatever the folder name is you used in the /models folder in text-generation-webui):
./start_windows.bat --extensions openai --listen --loader llama.cpp --model llama-2-7b-chatAnd it worked!

Except when I went to restart AutoGen. Suddenly now Python couldn’t find the import for the autogen library anymore.
A longer period of Googling and testing was proving not useful, however I kept coming back to pip not cooperating with conda. I had tried an accidental pip install autogen, which is different from pip install pyautogen, so I quickly corrected that mistake, ensuring I added the py this time, but still no resolution to the import issue. It was driving me insane because I started the day with AutoGen working and now it had decided it didn’t want to anymore.
More Googling kept pointing back to the conda env situation, which text-generation-webui used as part of its install process. So I finally ended up navigating to
text-generation-webui/installer_files/env/bin and executing the command:
pip install pyautogen in that directory and… that worked!
Something to do with the conda environment instead of global python, I didn’t exactly narrow down the specifics of the issue, but it was about midnight and this was my last ditch effort. I was just glad I was able to run AutoGen again and it was able to connect to the llama-2 model!
I didn’t get too much further than letting it run with the initial prompt. I realize now that I’m running the CPU focused model, when I should probably run the GPU optimized model to squeeze a little more performance out of the AI, so I’ll make that update soon. It performs fairly well, but some of the responses took over a minute to come back. I’m sure that time could be dropped well below 60 seconds.
I saw the article above recommending optimizing gpt-3.5 and gpt-4 depending on the situation, so I may return to that because I’d ideally like to have a more cost efficient gpt running in AutoGen along with other models like the local Llama 2. Would be nice to have a small set of AIs working on tasks together.
But for now, I’m excited to have the foundation laid for a team of AIs. I’m looking forward to experimenting with what they can accomplish, and I’m sure running into some other issues along the way, but it was well worth a full Sunday’s effort.
What should I have this team do? That will be a question for another time. If you have questions or recommendations before then, let me know at @jaypetersdotdev or email [email protected] and thanks for sticking with me if you made it this far!
Written by a human with some AI assistance


